Tree visualization
SCORPiOs tags corrected nodes in the gene trees to allow inspection using tree visualisation softwares (i.e ETE Toolkit or ggtree). To facilitate correction visualization, we provide a custom script that generates before-and-after images for corrected trees. Alternatively, output NHX files from SCORPiOs can also directly be loaded into online tree comparison tools such as Phylo.io.
Note
The dedicated tool makes it easier to visualize specific corrections by SCORPiOs, especially for large gene families with more than one duplicated subtree.
Visualizing tree corrections
With the default configuration, SCORPiOs saves individual corrected trees in the folder SCORPiOs_jobname/Corrections/tmp_whole_trees_0 (or SCORPiOs_jobname/Corrections/tmp_whole_trees_i for iteration i, in iterative mode). Our custom script scripts/trees/make_tree_images.py generates images based on the trees saved in this folder.
Important
You should ensure that the SCORPiOs conda environnment is activated before running scripts/trees/make_tree_images.py. You can activate it with conda activate scorpios.
Example
For instance, after a simple SCORPiOs run on example data, the following command creates images allowing to view all corrections for the salmonids WGD:
python scripts/trees/make_tree_images.py -i SCORPiOs_example/Corrections/tmp_whole_trees_0 --wgd Salmonidae --outgr 'Esox.lucius,Gasterosteus.aculeatus,Oryzias.latipes' -o SCORPiOs_example/Corrections/trees_img
Here are generated figures for a corrected tree (SCORPiOs_example/Corrections/trees_img/img_cor_27.png, right) and its before-correction counterpart (SCORPiOs_example/Corrections/trees_img/img_ori_27.png, left):
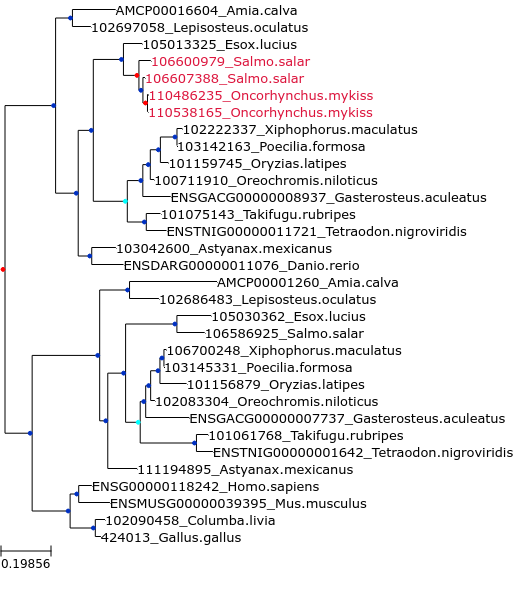
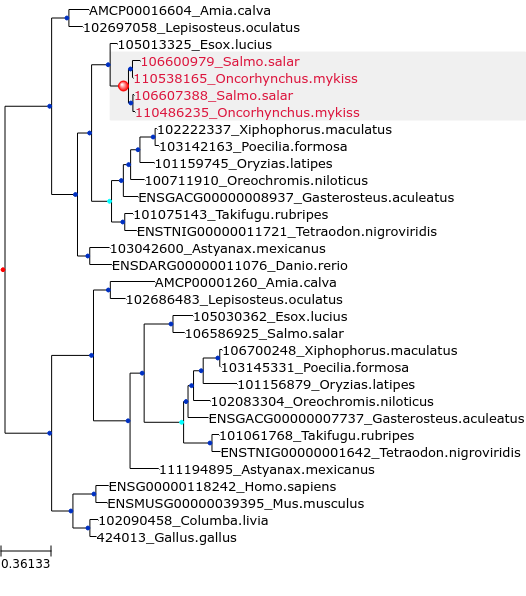
Internal nodes follow color conventions: duplications in red, dubious duplications in cyan and speciation in blue. Leaves of the SCORPiOs-corrected subtree are shown in the same color in the corrected and uncorrected versions. The corrected WGD node is highlighted with a bigger circle and a grey background.
Command-line arguments for scripts/trees/make_tree_images.py:
Required named arguments:
- -i INPUT, --input INPUT
Folder with corrected and original trees, or a list of tree files.
- -w WGD, --wgd=WGD
Corrected wgd to highlight. For instance, -wgd Clupeocephala will show only subtrees corrected for the wgd that occured in the Clupeocephala ancestor.
- --outgr OUTGROUP
Outgroup(s) used in SCORPiOs tree correction, comma-separated.
Optional arguments:
- -o OUTPUT, --output OUTPUT
Output folder, default is trees_img/
- -f FORMAT, --format FORMAT
Output format (pdf, svg or png).
- --show_moved
Color non-wgd rearranged leaves, default is False
- --color_outgr
Color the outgroup gene used by SCORPiOs, default is False
Using the phylo.io web interface
Alternatively, users can view original and corrected trees using the phylo.io web interface.
This only requires to paste in (or upload) corrected and original trees. You can either use individual gene trees stored in the SCORPiOs_example/Corrections/tmp_whole_trees_0/ or the full sets of gene trees (here data/example/forest.nhx and SCORPiOs_example/SCORPiOs_output_0.nhx, respectively). However, we recommend using individual trees for real datasets, as the amount of data can be quite large. With the compare function, original and corrected trees can be inspected side-by-side, with all differences highlighted.
For more details and example images, you can look at phylo.io documentation.